This post may contain affiliate links, which means I earn a small commission if you purchase something I recommend- at no additional cost to you! As an Amazon Associate I earn from qualifying purchases. Thank you for supporting this blog! Full disclosure here.
Crafting is a hobby that many people enjoy, but it can get overwhelming when you’re not sure how to store all your goodies. When your craft area is unogranized you may find yourself spending more money on supplies than you would like to because you’re just not sure of what all you have.
Luckily, there are lots of ways to organize your crafting materials without breaking the bank! This blog post will teach you how to get organized on a budget so that you can spend less time (and money!) searching for your favorite marker set and more time crafting.
Why Bother Organizing Your Craft Room?
You may be wondering why you should put in the effort to organize your craft room. Maybe you have a system of organized chaos or the room is frequently being thrown into disarray no matter what you do. We can all relate to the frustration of not being able to use a room due to its disorganization. That is why this post is the perfect way to get your room’s organization on track and keep up the organization for longer than a few days.

Organizing your craft room can help you take inventory of your supplies and foster an environment where you want to create rather than constantly clean up. Keeping your craft room cleaned and optimizing your storage allows you to see all of the things you have, which can prevent you from buying things you don’t need.
It also allows you to actually use your craft items, so you get your money’s worth out of them! This might also be the push you need to finally get back into crafting, or even continue to build on your crafting business and take it to the next level by having your space set up to allow for maximum production.
What should every craft room have to stay organized?
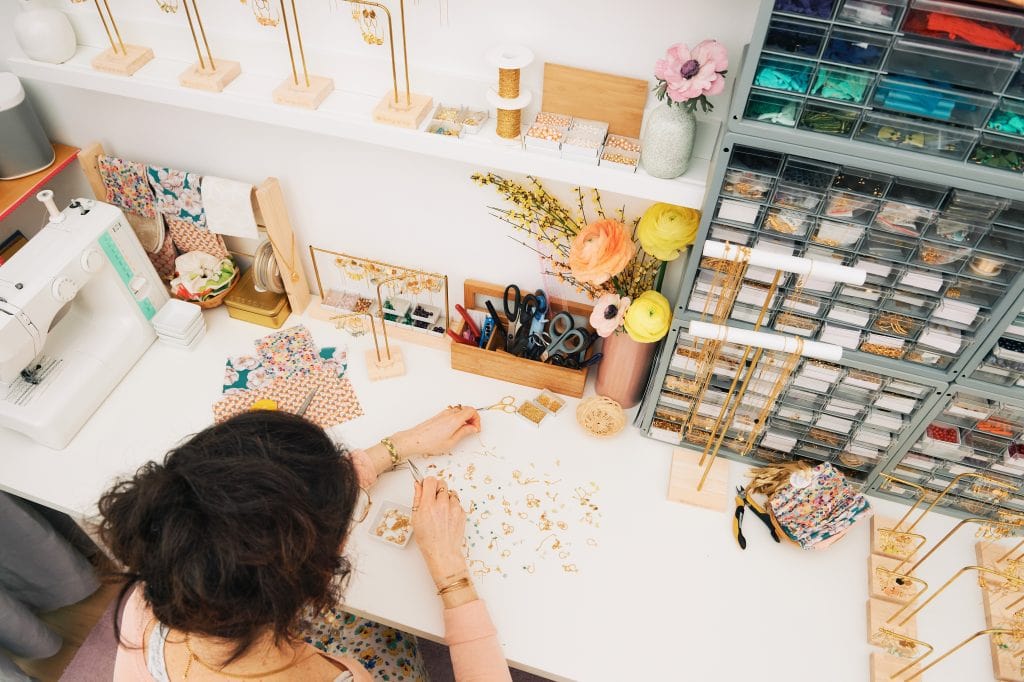
Every craft room should have a form of storage for excess supplies such as shelving, cubbies, or bins. You also should have something like hangers or a pegboard to hang up the items that you can and conserve space on the open surfaces.
This pegboard from Amazon is a great option because it is made from galvanized steel, meaning it is extremely strong and once you mount it to your wall, you will have no worries about it going anywhere! It also comes in several different colors for you to mix and match with the theme and designs or your craft room.

The goal should be to have enough room and open space to designate your creative space. This will help to increase creativity as it gives you a workspace that you don’t have to clean up beforehand. The space should be kept clean in order to avoid blocking one’s creative work. As we all know, you could get that sudden urge to fulfill a crafting idea but when you get to the room everything is a mess and there is no open area for your supplies or even for you to sit.
Then, once you spend the time to clean up and clear out a space that creative spark may be gone and now, you’re tired from all the cleanup. These ideas will help to combat this scenario and keep your space clean, tidy, and organized.
How to Organize Your Craft Room or Area
Step 1: Say Goodbye to Clutter
The first step to organization is to clear out any clutter. To do this you have to tackle the important step of classifying your items. You want to start to make piles or stacks of your like materials that you will eventually group together on shelves or in storage containers. This means all of the loose paper could be grouped together, and all of the larger sewing supplies such as fabrics, Velcro strips, and other materials could also be put together.

The easiest way to classify your items is by like materials, what they are used for, and their size. This means if you have smaller sewing supplies like your thread, needles, and seam rippers, then these would go into a different space rather than mixing with all of the fabrics or painting supplies.
Check out these decluttering challenges with free printables!
Step 2: Purchase Storage Options That Fit Your Space
The second step to organization is to purchase storage options that fit your space. This means you will have to measure out your space and where you want certain items to go. For example, if you want to add a shelving unit then you need to measure where you want it to go in your room and then search for those same specifications.
You should do the same with storage containers that you may purchase because there is nothing worse than buying containers and realizing that they don’t fit on the shelves. If you are looking to purchase a pegboard, you should also plan out and measure an accessible place on your craft room walls, this way you will not be struggling to get to the items you will hang up and the board will fit comfortably on the wall of your choice.

A great option to go along with your pegboard purchase are these accessories that you can use to optimize the hanging space. You can use these storage items for your smaller craft items.
Step 3: Give Everything Its Own Place
The third step, and the most rewarding step, is giving everything its own place. This is where you would take your categorized piles from the first step and find homes for them with your new storage items. The important part of this step is that you begin to put the items in accessible locations that make sense to you in a functional way.
This is because it will be counterintuitive if when you put away all of your craft items, you still have to search through different types of materials. That’s why you should store your items by crafting categories, such as painting supplies, sewing supplies, and other craft essentials.
You should have spaces for each type of craft so you can focus in one area for whatever specific craft idea you may have.

Creative Craft Room Organization Ideas
While your main goal is to organize and clear your crafting space, you should also get creative with this. You can focus on a theme for your room or even a color or type of design you prefer. This could be a more rustic look, utilitarian, or even just monotone colors for your storage options.
You can decorate your room with lights and even utilize natural light from your windows to create a space with optimal lighting for painting or drawing. If you want a more rustic feel, you can repurpose old or antique furniture like cabinets or baskets for your storage.
You could even organize by colors to give the effect, like in craft stores, of the rainbow assortment of options you have among your supplies.
How Can I Organize My Craft Room for Cheap?
When it comes to the cost of organizing a craft room, you may be a little worried, but there are many budget-friendly ways to organize and not break the bank. For instance, if you don’t want to buy storage containers you can repurpose some sturdy cardboard boxes you have lying around and place them as makeshift cubbies on your shelving.

You can also do the same with any old glass jars that you aren’t using, and a great storage option that most of us have lying around are those glass containers that candles come in. Once the candle has been used you can simply scrape out the leftover wax, wash it out, and now you store any small to medium-sized crafting items in them!
You can also utilize any old clothes hangers that you may have too many of. You can optimize a wall hanging coat rack and use the hangers to display fabrics, ribbons, and other materials. Another way to hang and display smaller fabrics, ribbons, or sewing thread, is with this paper towel holder for your pegboard. Using this paper towel holder, you can store all of your ribbons, threads, or tapes on it and save yourself from trying to find a jar to fit them all in. This way you can see all of your options and have easy access to them.

If you’re in a small home or small space, and don’t have a designated craft room, I love this portable craft cart that you can move from room to room and store in a closet or garage when not in use.

Storage ideas for craft supplies
Paint Brushes, Markers & Pencils
If you’re looking for a better way to store your paintbrushes, markers, sketch pencils, and colored pencils then look no further! There are many options for storing these items and some are extremely cheap! First, look around your house and see how many coffee cups you have lying around.
If you, like most people, have an overabundance of coffee mugs you can use these to store these items instead of spending money buying more and more containers. If you don’t have a million coffee mugs lying around you can also look for glass jars that you may not be using. You may not even realize that most of those jams and jellies you buy come in glass jars that you can use for this purpose but you definitely can!
If you have empty jam jars you can clean them out and use them as storage for your paintbrushes and other art supplies as well. If you are wanting to find a more all-encompassing way to store these items you can use this stationery desk organizer.

This option will allow you to keep all of your drawing and painting supplies in one location. Another great option, that actually moves, is this storage caddy that can rotate 360 degrees, in order to give you easy access to all of your supplies.

Paper
Storing paper may seem like a no-brainer but in the craft world there are many different kinds of paper and they can be used for many different craft options. For paper storage, you can use clear storage drawers and label them by the type of paper and what they are used for. For example, you can have one drawer labeled sketch paper, one for scrapbook paper, and one for construction paper.
This rolling drawer utility storage is a perfect option for this! This rolling storage has 10 drawers for all of your paper storage needs, and you can use these drawers for even more storage as well. The fact that it is movable also gives you the freedom to place it wherever you find convenient during your crafting sessions.

However, if you’re looking for something to save even more space in a smaller craft room, you can use this door hanging organizer! This over the door file organizer can fit all of your paper storing needs while offering you labels and storage for additional markers or hanging items. This is a great option to save space as it can go onto the back of your door, so it saves space without taking away the ability to open and close your door.

Scissors
If you’re planning on storing scissors it is important to note whether or not you have children and pets around, because you will want them to be stored safely if the craft room is a well-traveled family area. There are many different ways to store scissors safely, for one, you can add them to your pegboard with pegboard accessories.
This way you can hang them up where they are accessible but not at risk of falling or getting into small toddler hands. A great way to do this is with this multi-ring hook accessory. You can attach this to your pegboard and place the scissors in the rings to store them all in the same area.

Glue guns and other adhesive products
If you have other crafting items such as heat guns, glue guns, or other tools that may not be easy to store based on accessibility then you can use these wall hooks. These 36-piece wall hooks will be more than enough for you to hang items such as hot glue guns and smaller crafting tools, along with miscellaneous crafting items.

If you want to hang sturdier items like heat guns, then this set of pegboard accessories and locks will be a better option. These sturdy accessories come in various styles to accommodate for many odd and unique crafting tools!

Sewing Supplies
Sewing supplies have an array of materials from large fabrics and sewing machines to smaller sewing tools and threads. These materials run from many different sizes so it may be hard to find a one size fits all storage option, however, we can find some based on size and utility.
For instance, if you’re looking for a nice way to organize all of your threads then you could use this 360-degree rotating spool holder. This option can hold up to 84 spools and you can spin the holder around to see all of your available threads. If you have other miscellaneous sewing items such as buttons, yarns, charms, and others, then this rotating storage carousel will work for your space!

The containers are clear so you can see everything in them without digging through it, and the rotation makes it easy to spin and grab what you need. Finally, if you’re looking for a way to store your fabrics without just stacking them on a shelf you can use these fabric bins. These bins are stackable and have handles to easily move them, you can also place these on shelfs on their sides to create makeshift cubbies, that way you can see all of your fabrics without pulling out each bin.

How do I organize my craft room closet?
Organizing a small space such as a closet, for your craft supplies, may seem like a daunting task, but it is achievable! You can start by moving everything out of the closet, this is very much like the previous steps we discussed for organization.
You will have to categorize everything and measure the closet space you have. You want to make the most out of the room so you will need several shelving units, if your closet doesn’t have as many as you need. These shelves would be great to add storage space in a closet with few shelves. You can also get the most out of your closet space by using door storage. This hanging door organizer adds space for storage jars, adhesives, and paints!

Craft room shelving ideas
When it comes to shelving options there are many different ways to go about your storage. Whether you want to use the floating shelves from the previous section or you want to go a different route and bring in a whole new shelf for your supplies, there are seemingly endless possibilities.
These portable and movable storage cube shelves are good for those with larger craft storage to put away, the clear plastic also allows you to see inside all of the cubes to know where your supplies are with just a glance.

If you want a more classic and sturdy shelving system then this steel wire rack is for you. This can hold various cubbies and heavier crafting equipment like sewing machines or wooden organizers.

If there are smaller items you are trying to store and you don’t want to install more floating shelves, then you can use pegboard shelving. This pack of 4 shelves and brackets can be installed into any pegboard, which allows you to get the most out of that purchase and keeps all of your storage on one wall without drilling any additional holes.

The shelves can hold up to 20 pounds, so you can include several of your jars of smaller items on these to clear up desk space for your activities.
You can have the craft room you’ve always dreamed about, even on a budget!
Budget organization may seem impossible, but hopefully, now that you’ve read through these tips you know that’s not true! You can achieve an organized craft space without spending outside of your budget. Just remember to take an inventory of your items, measure your space, and make smart purchases!
Another thing to remember is that many household items and purchases can be repurposed for storage, so before you throw out those old candles, dowels, or jars, think about how you can use them to help you organize your space on a budget!
More DIY Organizing Ideas:
- Cheap or Free DIY Hacks to Organize your Home
- How to Organize a Small Pantry on a Budget
- Affordable Storage Ideas
- Organizing a Small Home on a Budget

Leave a Reply
hi! I'm shannon
I’m a wife, mom of three, doctor, and blogger! In 2018, I decided to turn my mom blog, into a personal finance blog so others could follow along on our journey to pay off over HALF a MILLION dollars in student loan and practice start up debt. I hope you enjoy following along, and maybe even find some inspiration along the way.
Are you calling me out, Shannon?! 😂 You are so right! Organization is such a money saver. I have finding a roll of black vinyl after I just purchased a new one thinking I was out 🤦🏻♀️
Author
LOL! you know it! This blog post was written just for you. hehe.