This post may contain affiliate links, which means I earn a small commission if you purchase something I recommend- at no additional cost to you! As an Amazon Associate I earn from qualifying purchases. Thank you for supporting this blog! Full disclosure here.
I made a Kentucky Derby fascinator from Dollar Tree supplies and honestly can’t believe how custom it turned out.
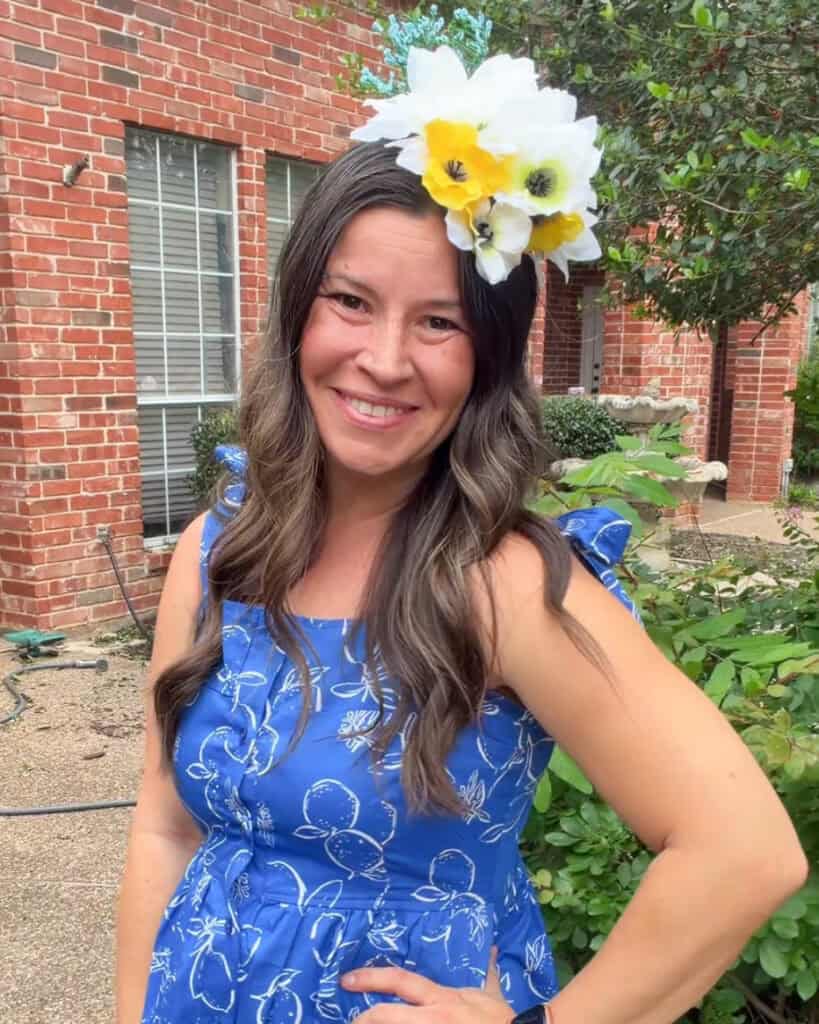
You know that feeling when you find the perfect Derby outfit but realize you need a hat that costs more than everything else combined? That was me last spring, scrolling through $60 fascinators that didn’t even match what I wanted to wear. So I grabbed a few things from Dollar Tree, some hot glue, and decided to wing it.
What happened next kind of blew my mind. Not only did it take less than 20 minutes, but people at the party thought I ordered it custom. The best part is you can match it perfectly to whatever you’re wearing since you’re choosing every single flower and accent piece.
Here’s exactly how I did it and why you should absolutely make one too.
What You’ll Need from Dollar Tree
This is where the magic starts, and I’m talking $5 to $7 total magic.
Most people think DIY projects require specialty craft store runs and a million supplies you’ll never use again. Not this one. Dollar Tree carries everything you need, and the quality is shockingly good for florals and headbands. I’ve made three of these now, and each one holds up beautifully through an entire day of wear.

Here’s your shopping list:
- One thin headband in any color (seriously, it doesn’t matter since you won’t see it)
- One sheet of felt in any color (again, this gets completely covered)
- 2-3 stems of large florals (roses, peonies, or hydrangeas work great)
- 1-2 stems of smaller accent flowers (baby’s breath, small roses, or filler florals)
- Optional accent pieces like feathers, ribbon loops, or decorative leaves
The key is choosing florals that coordinate with your outfit. I went with blush pink and cream for mine, but I’ve seen gorgeous ones in bold reds, classic whites, and even mixed metallics. Pull apart the stems when you get home so individual flowers are easier to work with. You’ll also need hot glue and scissors, which you probably already have.
Grab extras if you’re planning a fascinator-making station at your party because people will want to join in once they see how easy this is.
The Foundation That Changes Everything
Your base needs to be sturdy but invisible, and this two-step trick does exactly that.
Here’s what most DIY fascinators get wrong: they glue flowers directly to a headband, which looks flat and falls apart after an hour of wear. The secret is creating a felt foundation that gives you a stable surface to build on and adds dimension right from the start.
Cut two oval shapes from your felt, each about 3 to 4 inches long and 2 inches wide. They don’t need to be perfect because, again, no one will see them. Place your headband across one oval slightly off to the side (not dead center), then hot glue the second oval on top, sandwiching the headband between them. Press firmly and let it cool for a minute.

Position it just behind where your ear would sit so the finished fascinator sits at that classic angled spot on the side of your head. If you put it too far forward, it looks like a headband. Too far back, and it slides around.

This foundation is what makes your fascinator look professionally made instead of like flowers stuck to a headband. It creates height, stability, and gives you a proper base to layer florals without them flopping over.

Building Your Fascinator Layer by Layer
Start big, fill in small, and finish with accents that stick out for that signature look.
This is where your fascinator goes from “cute craft project” to “wait, where did you buy that?” The order you add flowers matters way more than I thought it would. When I made my first one, I just started gluing randomly and it looked messy and unbalanced. The second time, I followed this exact layering method, and it completely changed the result.

- Add your largest florals first. These anchor the whole design. I used two big roses and positioned them slightly overlapping on the felt base. Hot glue the stems flat against the felt, not just the flower heads. This keeps everything secure.
- Fill in around the front and back with medium-sized flowers. This is where you start building fullness. Tuck smaller blooms around and slightly under your large flowers, creating depth and covering any visible felt or stems. Don’t worry about symmetry. Fascinators look better with a slightly organic, asymmetrical arrangement.
- Add your smallest accent pieces. Baby’s breath, tiny roses, or decorative leaves go in last to fill any gaps and add texture. These are the details that make it look expensive and intentional.
- Finish with pieces that stick out the back. This is the classic fascinator shape everyone recognizes. I added two feathers and a looped ribbon that extend past the back of the arrangement by a few inches. This creates movement and that high-end look you see at actual Derby parties and royal weddings.

Work in sections and let the glue cool between layers so flowers don’t shift while you’re adding more. The whole process takes 15 to 20 minutes if you’re taking your time, less if you’ve done one before.
Step back every few flowers and look at it from the side. That’s the angle people will actually see it from, so make sure it looks full and balanced from that view, not just from directly above.

Pro Tips That Make Yours Look Custom
These are the tiny details that separate homemade from handmade.
After making a few of these and watching friends make theirs at my Derby party, I picked up on a few things that consistently make the difference between “that’s cute” and “oh my gosh, where did you get that?”
Use odd numbers of large flowers. Three or five looks more natural and visually interesting than two or four. I don’t know why this works, but it absolutely does.
Let some petals hang over the edge of your felt base. This hides the foundation completely and makes the whole thing look like it’s floating on your head instead of glued to a platform.
Point flowers in slightly different directions. All facing the same way looks stiff and crafty. Angling them creates dimension and makes it look like a professional arrangement.
Don’t overdo it. My first fascinator had every single flower I bought on it, and it looked heavy and overwhelming. Less is actually more here. You want it to look elegant and intentional, not like a flower explosion.
If you’re making these for a party activity, set up a little station with headbands, pre-cut felt ovals, pulled-apart florals, and a few hot glue guns. People can mix and match, and everyone leaves with a custom piece that matches their outfit. It’s honestly the best party activity because it’s creative but doesn’t require any skill, and guests get to take home something they’ll actually use.

Common Mistakes and How to Skip Them
Learn from my early fails so yours turns out perfect the first time.
Skipping the felt base: I tried gluing directly to the headband on my first attempt. The flowers had nothing to grip onto, everything sat flat, and it fell apart within an hour. The felt foundation is non-negotiable.
Using too much hot glue: More glue doesn’t mean more secure. It just means visible glue strings and a messy look. A small dab on the stem is all you need. If something feels loose, add another small dot rather than globbing it on.
Choosing flowers that are too heavy: Those big, gorgeous artificial sunflowers and giant dahlias look amazing, but they’re too heavy for a headband base. Stick with medium-weight florals like roses, peonies, and ranunculus. If a flower feels heavy in your hand, it’s too heavy for your head.
Not testing the placement first: Put the headband on and hold your felt base where you want it before you glue. Make sure it sits at a flattering angle and doesn’t poke your ear or slide too far back. Once it’s glued, moving it is a pain.
Your fascinator should feel secure but not tight, look full but not heavy, and stay put through photos, mingling, and maybe a little celebratory dancing when your horse wins.
The beauty of this whole project is that it’s low-risk. If you don’t love how it turns out, you’re out less than $10 and 20 minutes. But honestly, I haven’t seen anyone mess this up when they follow the layering method and don’t overthink it. Trust the process, and you’ll end up with something that looks like you paid someone to make it.
This is one of those rare DIY projects that actually looks better than the store-bought version because it’s completely customized to you. No one else at the party will have the exact same color combo, the exact same flower arrangement, or the exact same style. It’s yours, it matches your outfit perfectly, and you made it in less time than it takes to watch an episode of your favorite show.
Plus, every single person who asks where you got it is going to be shocked when you say Dollar Tree, and that reaction alone is worth the 20 minutes of crafting.
hi! I'm shannon
I’m a wife, mom of three, doctor, and blogger! In 2018, I decided to turn my mom blog, into a personal finance blog so others could follow along on our journey to pay off over HALF a MILLION dollars in student loan and practice start up debt. I hope you enjoy following along, and maybe even find some inspiration along the way.