This post may contain affiliate links, which means I earn a small commission if you purchase something I recommend- at no additional cost to you! As an Amazon Associate I earn from qualifying purchases. Thank you for supporting this blog! Full disclosure here.
This post is sponsored by Balloon Time and they are celebrating 40 years as a trusted partner for your celebrations big and small! Thank you for supporting the brands we love!

If you’ve been seeing those dreamy balloon ceiling setups all over Pinterest and Instagram… same.
They look amazing — like something straight out of a styled event — but there’s one problem I couldn’t ignore:
Most of them involve taping balloons directly to the ceiling.
And if you’ve ever dealt with peeling paint or sticky residue, you already know… that’s not the vibe.
So I set out to recreate that same “balloon ceiling” look in a way that was:
- easy
- affordable
- damage-free
- and actually doable at home
And…This might be one of my favorite party decor setups I’ve ever done.
What Is a Balloon Ceiling?
A balloon ceiling is exactly what it sounds like — a cluster of balloons that fill the upper space of a room, creating a floating, whimsical effect overhead.
It instantly transforms a space and makes even a simple setup feel like a full event.
You’ll often see this used for:
- birthday parties
- baby showers
- bridal showers
- holiday gatherings
- or themed parties (like my spring garden party!)
Why I Didn’t Tape Balloons to the Ceiling
A lot of tutorials suggest using tape or adhesive strips to attach balloons directly to your ceiling.
But here’s the issue:
- it can peel paint
- leave residue
- damage textured ceilings
And personally… I just wasn’t willing to risk it.
The Easy Alternative: Helium Balloon Ceiling
Instead of attaching balloons to the ceiling…let them float there naturally

I used a jumbo helium tank to fill about 40–50 balloons in just a few minutes, and they float right up to the ceiling on their own.
No tape. No damage. No stress.
And the best part? It gives you that full, professional balloon installation look — without hiring anyone.
Supplies You’ll Need
To create your own balloon ceiling, you only need a few simple supplies:
- 30–50 latex balloons (I used soft pastel colors)
- Jumbo helium tank from Balloon Time
- Ribbon or string
- Balloon weights (or small DIY weights like rocks in jars)

Optional but recommended:
- Lightweight fabric or ribbon for balloon tails
- Scissors
Step-by-Step: How to Make a Balloon Ceiling
1. Fill Your Balloons with Helium
Use your helium tank to fill each balloon.
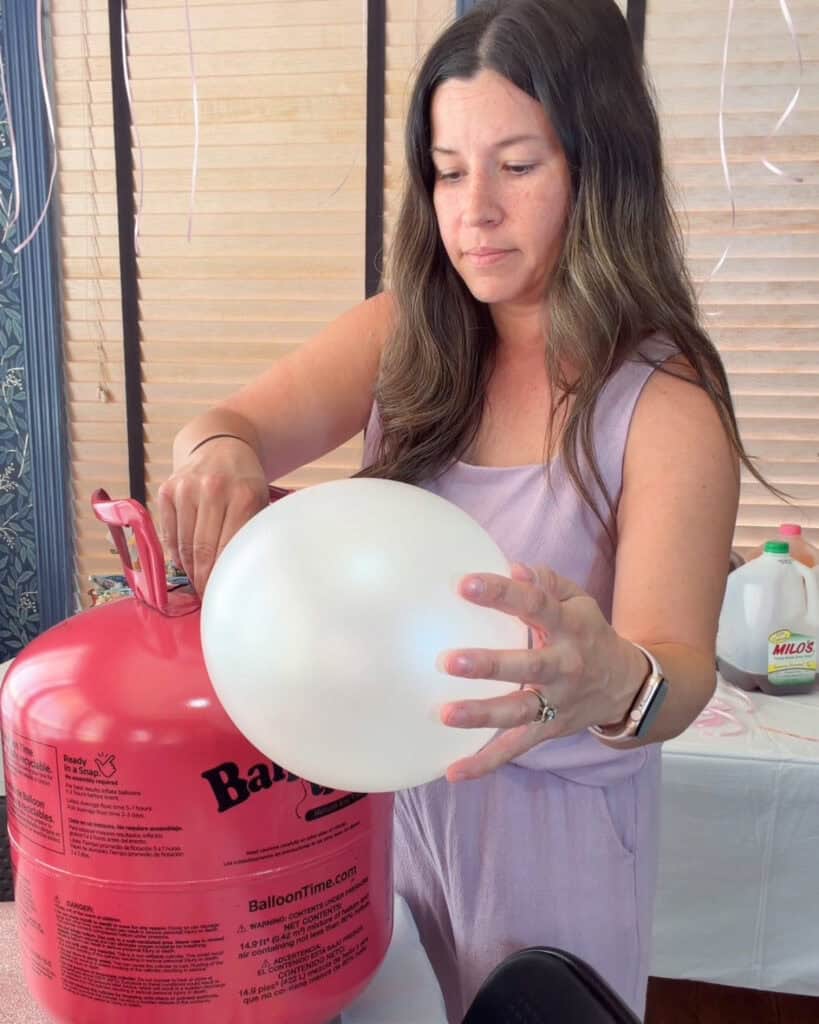
This goes FAST — I was able to fill close to 50 balloons in just a few minutes.
PRO TIP: Make sure to inflate the balloons within 1-2 hours of the event so you can ensure the maximum float time of 5-7 hours.

2. Attach Ribbon or String
Tie a ribbon or string to each balloon.
I recommend varying the lengths slightly so the balloons don’t all sit at the exact same height — this creates a fuller, more natural look.

3. Add Weights (optional)
Attach small weights to the bottom of each balloon (or small clusters of balloons).
This keeps them from drifting and helps you control placement.
4. Let Them Float to the Ceiling
Once filled, the balloons will naturally rise and create that “ceiling” effect.
No tape needed!

5. Add Decorative Balloon Tails (Optional but SO Worth It)
This was my favorite part.
To add a whimsical, high-end look, I created balloon tails using dollar store plastic tablecloths.
I simply cut them into strips and tied them to the balloon strings.
It added:
- movement
- texture
- color
…and made the entire setup feel more styled and intentional.
How I Styled My Balloon Ceiling for a Party
I used this setup for a spring garden party / tea party, and it completely transformed the space.
Underneath the balloon ceiling, I added:
- a simple table setup
- soft florals
- light pastel decor
And that was it.
The balloons did most of the work — which is exactly what you want from party decor.

Balloon Ceiling Tips for the Best Results
If you’re trying this yourself, here are a few tips:
- Don’t overcrowd — 30–50 balloons is usually plenty
- Stick to a color palette for a cohesive look
- Vary ribbon lengths and colors for dimension
- Use lightweight materials for tails so they flow nicely
- Anchor your balloons so they don’t drift too much if you decide to do this outdoors
Why This Is My Favorite DIY Balloon Decor Idea
I love this setup because it hits all the marks:
✔ Looks high-end
✔ Budget-friendly
✔ Easy to DIY
✔ No damage to your home
✔ Works for SO many occasions
It’s one of those rare ideas that looks complicated… but really isn’t.

Watch the Full Setup + Get Supplies
If you want to see exactly how this came together, you can watch the full setup here.
And if you want to grab the same helium tank I used,you can find it here.
More Spring Party Ideas
I’m sharing more ideas from this setup, including:
- DIY tea party decor
- dollar store party hacks
- easy food + drink ideas
hi! I'm shannon
I’m a wife, mom of three, doctor, and blogger! In 2018, I decided to turn my mom blog, into a personal finance blog so others could follow along on our journey to pay off over HALF a MILLION dollars in student loan and practice start up debt. I hope you enjoy following along, and maybe even find some inspiration along the way.