This post may contain affiliate links, which means I earn a small commission if you purchase something I recommend- at no additional cost to you! As an Amazon Associate I earn from qualifying purchases. Thank you for supporting this blog! Full disclosure here.
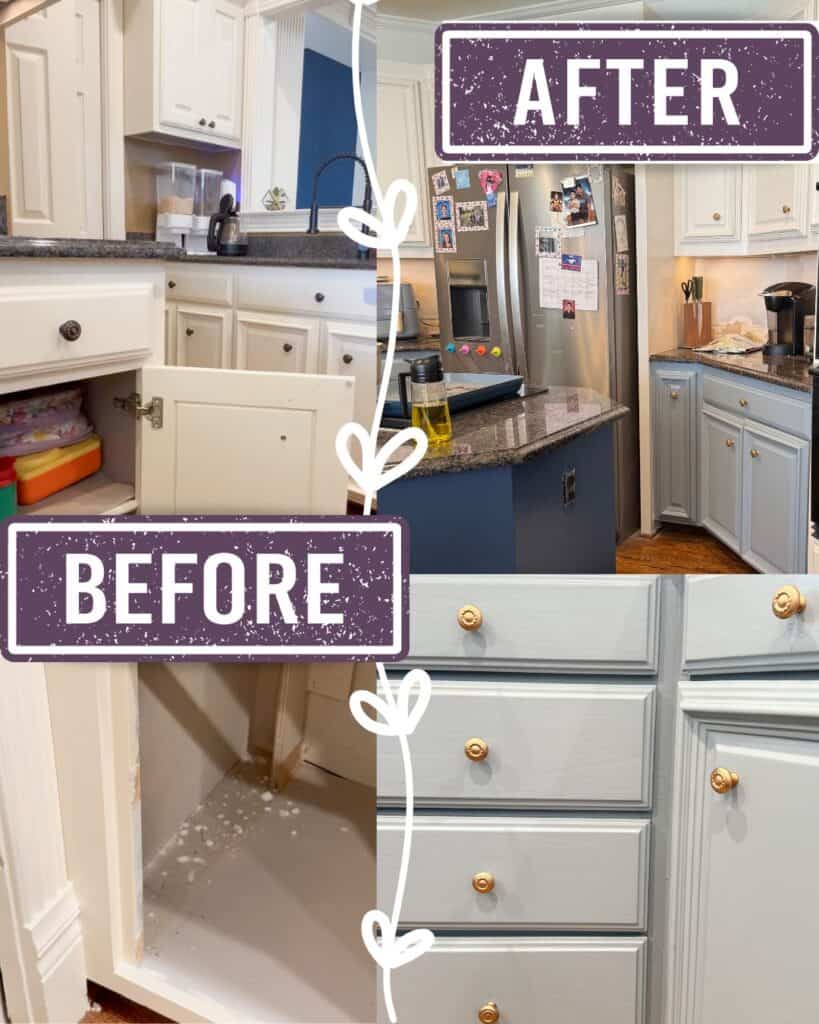
If a full kitchen renovation is outside your budget, there are plenty of options to give your old cabinets and kitchen new life! In this DIY kitchen makeover, I’ll show a step-by-step guide for how to remodel kitchen cabinets, without breaking the bank!
If your old kitchen cabinets are making your space feel tired and dated, you’re probably wondering—what’s the best way to upgrade without spending a fortune?
A full kitchen remodel can cost tens of thousands of dollars, and let’s be honest—custom cabinets, new countertops, and professional help just aren’t in the cards for most of us right now. But here’s the good news: with some creative thinking and cost-effective ways to remodel, you can completely transform the look of your kitchen cabinets without gutting your whole space.
In this post, I’m walking you through how to remodel kitchen cabinets on a budget, with my real-life cost breakdown, DIY tips, and ideas for getting that dream kitchen look—without the dream-sized price tag.
First Step: Decide If Your Cabinets Are in Good Condition
Before you start tearing things out, take a look at the structure of your current kitchen. If your cabinet doors, drawer fronts, and frames are in good condition, you might not need new cabinets at all.
In my case, the layout worked great, and the cabinets were sturdy—just outdated. That made a simple paint job the best option and saved us a ton of money right out of the gate.

Budget Breakdown: Remodeling My Kitchen Cabinets with Paint
I wanted to give our kitchen a fresh look without a full tear-down. So instead of hiring a general contractor or shopping for custom cabinets, I gave our existing setup a makeover with a fresh coat of paint, some up-cycled hardware, and a whole lot of DIY.
Here’s what I spent:
Paint Samples – $40
I tried several color schemes before landing on a beautiful navy blue (English Channel by Behr Paint) for the stovetop island, a grayish-blue (French Colony by Behr Paint) for the lower cabinets and a crisp white for the upper cabinets (Whisper White by Behr Paint).

Cabinet Paint – $240
I used:
- 2 gallons of French Colony Blue
- 2 gallons of Whisper White
- 1 gallon of English Channel for our kitchen island
(Leftovers will go toward the crown molding and open shelving in the dining nook!)
Primer – $60
This is the most important step for a long-lasting finish!
New Hardware – $8
Instead of buying all new, I refreshed our knobs and pulls with Rub ‘n Buff. It gave us a modern look for next to nothing.
Full DIY tutorial to update your current cabinet hardware using Rub ‘n Buff here!

Replacement Hinges – $80
Some were broken beyond saving, but I reused what I could.
DIY Supplies – $64
Includes drop cloths, sandpaper, brushes, and more.
Optional Tools
- Paint sprayer – $100
- Electric sander – $50
Total so far: $642 for a full kitchen cabinet makeover!
Compare that to the average kitchen remodel costs, where just painting the cabinets can run between $4,000–$10,000, and a full on kitchen demo and remodel can cost as much as $50K, and you’ll see why this is such a great way to save.
You can browse a full supply list of everything I used, and see video examples here on my LTK.
Tips for Remodeling Your Kitchen Cabinets the Frugal Way
If you’re going to DIY your cabinets, here are some tips to get the best results:
1. Clean and Sand Thoroughly
It’s not glamorous, but prepping is the most important step. A smooth surface means your paint will go on evenly and last a long time.
Sanding is not a fun or easy job! Since I do quite a few DIY and craft projects around the house, I invested in this electric sander which is pretty affordable and well worth it at around $50.

2. Label Every Door and Drawer
Trust me, your upper cabinets will start to look the same once they’re off the hinges. Painter’s tape with a quick number system makes final touches way easier later.
I wrote on my doors and drawers with a Sharpie, and then of course painted over them! Oops. I spent half a day trying to figure out what door went where…I was going crazy!
Definitely draw out a picture, or use tape to label so you can keep better track, don’t be like me! LOL.

3. Consider a Paint Sprayer (more on this below)
It’s a better option for achieving a smooth, streak-free finish, especially on drawer fronts and cabinet doors.
I don’t know if it helped to stretch the paint further because I was adding water to thin it, or if it wasted more paint, but either way it DEFINITELY saved a ton of time!

4. Choose the Right Color
A pop of color like navy blue can make your kitchen island a focal point, while white or light gray tones give a more classic look and a cohesive look when paired with stone backsplash or natural stone countertops.
Use those paint samples and then take a couple of days to really look at them. Notice how the color changes with different lighting and at different times of day. This is so important so you don’t end up having to start over when you don’t love the color.

Step-by-Step Guide: How to Paint Kitchen Cabinets for Beginners
1. Clear and Prep the Area
Move everything off your countertops and out of your cabinets. Lay down drop cloths or plastic sheeting to protect your floors, appliances, and countertops. Tape off areas you don’t want painted.
Speaking from experience: Okay, to be perfectly honest, I did this step in bits and pieces! I cleared out a few things, painted an area, then put it back. I’m a little bit messy and wild that way! haha! But it will be MUCH easier to make progress if you can clear everything out of your kitchen and get it all done at once.
2. Remove Cabinet Doors, Drawers, and Hardware
Take off all cabinet doors and drawer fronts. Remove knobs, pulls, and hinges. Keep all hardware organized in labeled bags or containers so you can easily reassemble everything later.

3. Clean All Surfaces Thoroughly
Use a degreasing cleaner (like TSP or a vinegar solution) to remove built-up grease and grime. This is a super important step—paint won’t stick to dirty cabinets!
4. Label Everything
Use painter’s tape to number each door and drawer, and write the matching number inside the cabinet frame. This will make reassembly so much easier.

5. Fill Holes or Dents (if needed)
If you’re changing hardware or have damage, fill holes with wood filler. Let it dry completely and sand smooth.
6. Lightly Sand Everything
Use medium-grit sandpaper (around 120–150 grit) to scuff the surface of the cabinets. This helps the primer and paint adhere better.
7. Clean Again
After sanding, wipe down all surfaces with a tack cloth or damp rag to remove dust.
8. Apply Primer
Use a good bonding primer suitable for cabinets. This seals the surface and preps it for a long-lasting finish. Let it dry completely.

9. Sand Lightly Between Coats
For best results, lightly sand between each coat of primer and paint with a fine-grit sandpaper (220 grit). This helps keep the finish smooth.
10. Apply Paint (Using Brush, Roller, or Sprayer)
Use your preferred method—brush and roller for tight spaces, or a paint sprayer (like the Wagner!) for a smooth, professional finish. Apply 2–3 thin, even coats, letting each one dry fully.

11. Let Everything Cure
Even after the paint feels dry to the touch, it needs a few days to fully cure. Be gentle with your cabinet doors and drawers during this time.
12. Reattach Hardware and Reinstall Cabinets
Once everything is dry and cured, reinstall your hardware (or upgrade to something fresh and modern!), and screw doors and drawers back into place according to your labels.

13. Step Back and Admire Your Work!
You did it! Your kitchen has a whole new look—without the cost of new cabinets.
Bonus Ideas for an Even Bigger Impact
Looking for simple changes to boost your kitchen’s look without a full kitchen remodel? Here are a few:
- Add open shelves in place of a few upper cabinets for easy access and a touch of modern kitchen style.
- Upgrade your under-cabinet lighting for better food prep visibility and ambiance.
- Swap out your dated counters for butcher block island tops or affordable granite countertops from local stores or Lowe’s reserves.
- Install ceramic tile or subway tile for a new backsplash that instantly adds style.
- Refresh your new kitchen space with new flooring that ties it all together.
- If needed, hire out tricky tasks like electrical work or electrical wiring, which are best left to pros.
There are plenty of ways to customize your space depending on the size of your kitchen, your remodeling plans, and your budget.
How to Use a Paint Sprayer for Kitchen Cabinets (Tips for Beginners)
If you’re going for that super smooth, professional finish, using a paint sprayer—like the Wagner Paint Sprayer I used—is a total game-changer. It gives your cabinets an even, streak-free look that’s tough to achieve with a brush or roller, especially on large surfaces like cabinet doors or drawer fronts.

Here are a few tips I picked up along the way:
- Practice first. Before jumping into your cabinet doors, practice on a scrap board or cardboard to get used to the spray pattern and speed.
- Thin your paint. Depending on the model, you may need to thin your paint slightly (check your Wagner sprayer manual for exact ratios). This helps the paint flow evenly through the nozzle.
- Keep it moving. Hold the sprayer about 6–8 inches away from the surface and move in steady, overlapping strokes. Don’t hover too long in one spot or you’ll get drips.
- Use light coats. Several light coats will look way better than one heavy one. Be patient and let each coat dry fully before the next.
- Protect your space. Paint sprayers create a fine mist, so be sure to mask off surrounding areas or spray outdoors/in a well-ventilated area like a garage with drop cloths and painter’s plastic.

Once you get the hang of it, the sprayer actually saves a ton of time—and delivers that flawless finish that makes your cabinets look like a million bucks, even if you’re on a budget!
Final Thoughts: Remodeling Cabinets Without Spending Too Much Money
Whether you’re working with a small kitchen or trying to stretch your budget in a new home, learning how to remodel kitchen cabinets is one of the easiest ways to upgrade your space without spending a fortune.
With the right supplies and a little DIY spirit, even a few simple additions—like a fresh coat of paint, updated hardware, and maybe a few open shelves—can make a big difference in your kitchen design.

So if you’re dreaming of a new look, but not the labor costs of a total overhaul, this might be the perfect first step to creating the kitchen of your dreams—on a budget.
More DIY Home Ideas
Ready to try it yourself? Save this post for later and follow along for more budget-friendly DIYs, frugal home tips, and easy ways to transform your space—without overspending.

hi! I'm shannon
I’m a wife, mom of three, doctor, and blogger! In 2018, I decided to turn my mom blog, into a personal finance blog so others could follow along on our journey to pay off over HALF a MILLION dollars in student loan and practice start up debt. I hope you enjoy following along, and maybe even find some inspiration along the way.